i-am.ws |
jQuery Mobile on Android
I developed an app for BlackBerry PlayBook that is using the jQuery Mobile toolkit to create the user interface. Now jQM is a portable framework that can run on many platforms, ranging from your regular Chrome, FireFox or Safari browser, to mobile devices like iPhone or Android.
Searching for how to deploy jQuery Mobile on Android, most examples are written as a WebApp. The code is loaded on a web-server and you point your Android browser to it to start the app. But what I wanted was everything packaged in an .apk file that can be installed from the Android AppMarket. To achieve this, you have to create a small Java wrapper around your html and JavaScript code. In this tutorial I will be using Eclipse on CentOS as my development platform.
- First step is to create in Eclipse a new project: "File > New > Android Project" and give it a name (let's say "IceCream", I copied the jQM code from a blog by Matt Doyle), select the target and enter the package name, like "ws.iam.icecream". Keep Create Activity checked.
- Next we'll be adding a WebKit WebView to onCreate():
    package ws.iam.icecream;

    import android.app.Activity;
    import android.os.Bundle;
    import android.view.Window;
    import android.webkit.WebSettings;
    import android.webkit.WebView;
    import android.webkit.WebViewClient;

    public class IceCreamActivity extends Activity {

        @Override
        public void onCreate(Bundle savedInstanceState) {

            super.onCreate(savedInstanceState);
            this.requestWindowFeature(Window.FEATURE_NO_TITLE);
            setContentView(R.layout.main);

            WebView webView = (WebView) findViewById(R.id.webview);
            WebSettings webSettings = webView.getSettings();
            webSettings.setJavaScriptEnabled(true);
            webView.setWebViewClient(new WebViewClient());
            webView.loadUrl("file:///android_asset/index.html");

            return;
        }
    }
- And if you want to use HTML5 LocalStorage, you should add after "webSettings.setJavaScriptEnabled()" the following:
            webSettings.setDatabaseEnabled(true);
            webSettings.setDomStorageEnabled(true);
- This WebView will replace the LinearLayout in res > layout > main.xml.
    <WebView xmlns:android="http://schemas.android.com/apk/res/android"
        android:id="@+id/webview"
        android:layout_width="fill_parent"
        android:layout_height="fill_parent"
        android:scrollbars="none" />
- While we're at it, we should update the AndroidManifest.xml file. Just after the <use-sdk> parameter, add the following line:
<uses-permission android:name="android.permission.INTERNET"></uses-permission>
- Also we need to prevent Android from creating a new Activity when the user rotates his tablet. Add a parameter to the Activity declaration (for recent SDK versions, this should be android:configChanges="orientation,screenSize"):
    <activity
        android:name=".IceCreamActivity"
        android:label="@string/app_name"
        android:configChanges="orientation">
- You probably want to replace the default res > drawable > icon.png files (in three resolutions) with your own.
- Now we get to the core of this tutorial. Which is how to wrap the html, css and javascript of jQuery Mobile. Those files get all placed in the "assets" folder of the Eclipse project. And our Java Activity is attaching to that with the "webView.loadUrl()" call that we saw above. So, right click "assets", then "New > File" and give it the name "index.html". Right click the file and do "Open With > Text Editor" and now copy-paste our Ice Cream Order html code into it.
- Typically the jQuery Mobile javascript libs get loaded from the web. But I prefer to make it part of the package. Again right click "assets" and "New > Folder" and call it "js". Now, outside of Eclipse, copy your "jquery-1.5.2.min.js" and "jquery.mobile-1.0a4.1.min.js" into this "Workspace/IceCream/assets/js" folder. Similarly create a folder "assets/css" and copy "jquery.mobile-1.0a4.1.min.css" into it. (By now you're probably using newer jQM versions, that's ok.)
- At the top of your index.html file, include the following lines:
    <link rel="stylesheet" href="css/jquery.mobile-1.0a4.1.min.css" />
    <script src="js/jquery-1.5.2.min.js"></script>
    <script src="js/jquery.mobile-1.0a4.1.min.js"></script>
and if you have your own javascript and stylesheets, add those as well:
    <link rel="stylesheet" href="css/icecream.css" />
    <script type="text/javascript" src="js/icecream.js"></script>
Finally, within Eclipse, right click these files and do a "Refresh".
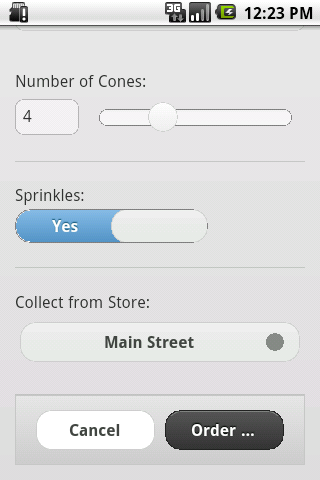
And now you're all set to run your new app. Probably first just in the emulator. Give it a shot and you should see something like this.

Although this is a working app now, with the java code doing nothing more than being a wrapper, I like to add some native Android functionality. And that is a menu to Reload the app and to Exit it. To do that we've to add two more methods: "onCreateOptionsMenu()" and "onOptionsItemSelected()". Check it out in the complete source code for the Activity.
That all being done, you've to package up the whole thing, sign it and upload it to the Android market. I use Eclipse for this:
- select your IceCream project
- then "File > Export"
- expand the "Android" option and select "Export Android Application", click "Next"
- and "Next" again
- enter the details of your key-store (I assume you have one), click "Next"
- select "Create new key", click "Next"
- give your key the alias name "icecream", enter and confirm a password, give it a validity of 25 years, enter your name and country code and click "Next"
- enter folder and filename "IceCream.apk"
- and finally you can click "Finish".
The resulting packaged and signed application can be uploaded to the Android market, or copied to your Android device using a USB key.
Posted at 01:58PM Nov 20, 2011 by WWWillem in Software |